In the oil and gas industry, a Turn Around is a planned break in production so repairs and maintenance, that can't be done while the unit is operational, can be performed. During a Turn Around, the work rules change to allow a more lenient schedule because of the urgent need to get as much work done as quickly as possible.
Employees are allowed to work longer hours and longer work sets (work days in a row without a long break) than they are when a plant is operating normally during a Turn Around.
For example, the API RP755 v2 allows 182 hours in a work set during outages instead of the 92h (or 105h for straight days) allowed during regular operations.
Creating a Turnaround
The Turn Around/Outage in SchedulePro works at a Group level. This means that, to tell the system to apply a different set of rules for the employees working the Turn Around, we need to put a Group (or Groups) of employees in the Turn Around.
- Go to Home > Turn Around/Outages
- Click 'New'.
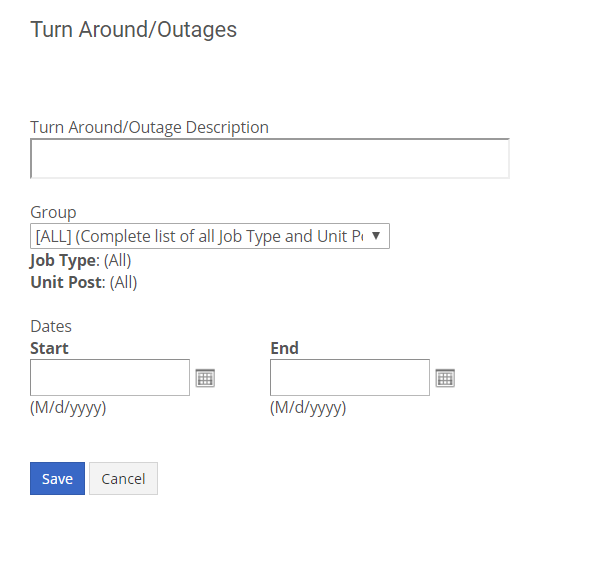
- Add the Turn Around/Outages Description (or name) for the new Turn Around.
- Select the relevant Group (or All).
- Enter the Dates (date range) for the Turn Around, then click 'Save'.
All employees assigned to a Location/Unit code for that selected group will have the relaxed work rules applied to them during the date range entered for the outage.
What if I don't want to put the whole unit in a Turn Around?
When assigning an individual or a limited number of people to Turn Around, a separate Turn Around Group with specified Turn Around Location/Unit codes must be created.
Remember, the Turn Around/Outage rules work at the Group level, so placing a specific Group on Turn Around (e.g. Cat Cracker or Sulfur group) would cause everyone in that Group to be working under Turn Around rules. This means that if any of those employees worked in a Location not on Turn Around during the Turn Around, they'd be scheduled according to the more lenient rules and might incur an RP 755 violation.
If you don't want/need to put the whole unit in a Turn Around, you will need to build a new Turn Around Group and assign employees to it for the duration of the time that they're working on the Turn Around. For this, it is a good practice to first create Turn Around Jobs for each one of your Units and then create your Turn Around Group that will contain all those Turn Around Jobs (or any that may apply for the specific Turn Around).
Assigning Employees to the Turn Around Group
Remember that a Group in SchedulePro is a combination of roles (Positions) and Jobs (Locations). When you create a Group in the system, you select one (or more) Position(s) and one (or more) Location(s). Any employee who gets assigned to any of the possible combinations of those selected Positions and Locations will belong to that Group.
For example, if for your Turn Around Group you select the OPER Position and the TAU1, TAU2, and TAU3 Locations, any employee that is assigned to OPER/TAU1, OPER/TAU2, or OPER/TAU3 will be part of the Group.
There are 3 different ways to assign employees to a Turn Around Group:
- Amending the Primary Location for that employee in their profile - If a schedule already exists for the Turnaround period, a recreation of that employee schedule will need to be done to override the shifts with the updated Primary.
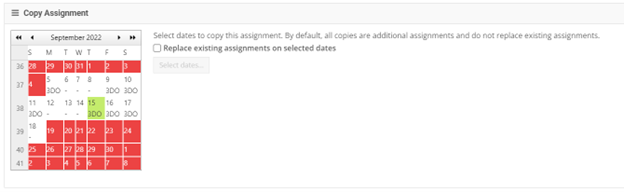
- Using the Copy Assignment function in the shift edit popup to change a shift to the Turnaround Location, then copy over onto other dates to have a Turn Around shift applied.
- Create a Turn Around Shift Pattern with any OT hours marked using the override feature if needed, and set the Turn Around Location/Unit codes into the shift pattern. Then apply this pattern to the relevant employees for the set date range and queue up their regular pattern to restart after the end of the Turn Around (see next section).
Assigning the Turn Around Shift Pattern to Employees
Turn Around schedules can be incorporated by changing the Effective Dates of an employee's current Shift Pattern, then adding a temporary Turn Around Shift Pattern for the relevant date range.
- Create a new Shift Pattern Template under Home > Settings > Template Libraries > Shift Patterns that reflects the Turn Around schedule.
- From the Employee Profile, go to the 'Shift Patterns' tab for the employee in question.

- Click 'Import from Template Library' and assign the Turn Around template created in Step 1, then select the Primary Hourly Type and set the Effective Dates to the start/end of the Turn Around period. *Do not change the rotation start date, then click 'OK'.

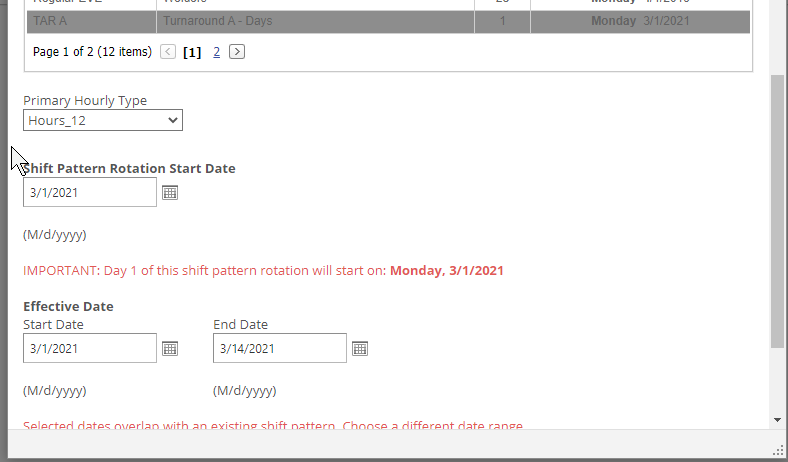
-
On the next screen, the selected Shift Pattern will show, then click 'Save'.
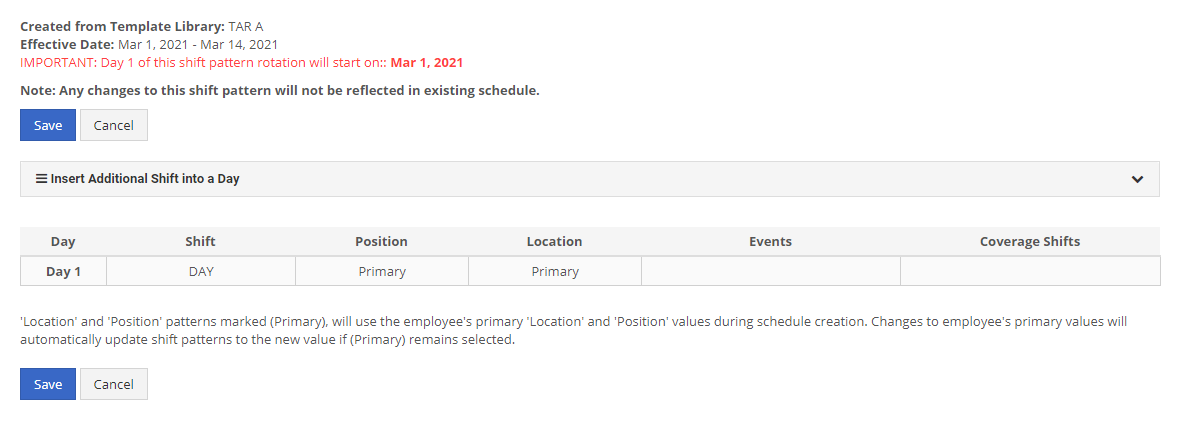
- The Shift Pattern is now added to the employee for the dates of the Turn Around, and after it ends, the previous Shift Pattern will continue.

While it may seem like a lot of work to manually change several employees' data to Turn Around for the month that they're on it, trust us, it's worth it to maintain flawless compliance reporting and to avoid unnecessarily manual scheduling for the whole duration of the Turn Around.
Assigning a Turn Around Shift Pattern using the Bulk Export/Import Tool
If you need to apply a Turn Around schedule for multiple employees at once, our Bulk Export/Import tool can be utilized by following the steps below.
- Go to Settings>Bulk Data Export and export the Employee Shift Patterns From Library.
- Open the .CSV file exported in Step 1 and remove (if you want) all employees that you won't need to apply the Turn Around Shift Pattern to.
- Sort the file by Employee Number and by Effective Date
- For each employee that you want to add the Turn Around Shift Pattern to, copy the last line (the newest date) and insert it twice.
- Update one of the new lines copied from Step 4 to be the new Turn Around Shift Pattern and set the Effective Date to the start date of the Turn Around.
- Change only the Effective Date of the second new line to be the next day after the end date of the Turn Around (the Shift Pattern will be the old Shift Pattern).
For Example, The Turn Around goes from March 1, 2021 to March 14, 2021 for employees who belong to Team B.
- When exporting the Employee Shift Patterns From Library file from Step 1, it shows:

- When we copy the last line (the newest date) and insert it twice from Step 4, it will look like the below:
- In the 3rd line shown below, the Effective Date has been updated from 02/01/2020 to 03/1/2021, and the Shift Pattern Library Name has been changed to TAR B (Turn Around Shift Pattern), which is Step 5 listed above:
Please Note:
- When we import this file, the system will update the Shift Pattern assigned to all the employees listed in that file.
- If an employee is not in that list, the Shift pattern assignment won't be modified.
- For all the employees in the imported file, if you remove lines from the original export file, those shift patterns will be removed from the Employee Profile.
- The Effective Dates shown in the Employee Shift Patterns from Library file are the Start Date of the Shift Pattern.
- Each Shift Pattern will start on that date and end the day before the next Shift Pattern assigned to that employee in the file.
- For the Shift Pattern that has the newest date (for each employee), the system will assign that Shift Pattern as the last one, with an end date of 1/1/2100.